Wednesday, 30 November 2011
(Research) Purpose of Ancillary Products
 |
| Yesterday we had our first lesson on looking at the ancillary products we will be producing (a digi-pak and magazine advertisement). We looked at what they are and why they are used, and the do's and dont's when producing them, using examples of previous student work as a base to figure out what works and what doesn't. |
What is a Digi-Pack?: A Digi-Pack is in some ways a more in depth version of your traditional 4 panel album case. They are available in either four, six or eight panels which fold in on themselves. These panels normally consist of more information and graphics related to the artist. It is used as a way for the music industry to add value to an album and sell it at a slightly bumped up price. One other thing that it is useful for it that it sort of helps combat the ever growing problem of piracy because, even though a fan can illegally download the album; they would not be able to get the physical extras that come with a digi-pack. In my opinion I don't really think this makes that much of a difference in this day and age, especially because of this new generation of music fans that practically see the process of obtaining music illegally as the only way to enjoy their favourite artist music.
Why are CD covers still used?:
The main function of a CD cover has always been to promote and sell the artist and their music. When you walk around a shop you don't look at every single artist and album, you do a quick browse without going into particular detail, it is usually the CD cover that attracts you to it, and in some cases if you don't know the name of the artist it is the CD cover that will help you find it.
 | |
| An example of a limited edition digipak advert, clearly stating the number of panels it has, how many pages the booklet has and the number of bonus tracks that come with it. |
We also looked at the features of a digipak which we will need to incorporate into our own designs. The main features that will definitely need to be included are the name of the artist, name of album, tracklist on the back, copyright disclaimer, label and optional email/ contact information. One of the most important things that must be thought about in depth is the colour scheme of and fonts used. because it is important that there is recurring visual link between the ancillary products otherwise there could be a chance of the consumer getting confused as to weather or not a certain single, album, music video or some sort of artist merchandise are all related and not just "Random".
What makes Digipak's so popular?: As a class, we raised several points in response to this question, but the one that kept on being repeated the most was Artist Image the reason why is because it helps consumers to be able to identify the artist that is portrayed on the artwork; especially if the artist shown is seen as influential style icon of some sort. A classical example of this would be Rihanna; for each of her albums she has adapted a unique image and style, which has proved to be influential across the globe. When she released her 5th album Loud, on the front cover of it she is shown to have red hair. In choosing to do this, Rihanna started a worldwide phenomena; females both young and old from all over joined in with this latest craze of dying their hair red. This without doubt cemented her status as a style icon; if ever doubted before.

Sunday, 27 November 2011
Call Of Duty quote
Call Of Duty
From looking at Kanye West's all of the lights video, we mentioned the beginning having a precaution regarding flashing imagery which of course is for medical reasons. In the end, little to none flash imagery was used so there was no need to actually use a precautionary sign. However we were faced with a slow 2 to 3 second build up to the song which is long for a video to begin playing. To fill this space with something meaningful an idea occurred from Wretch 32 and Example's Unorthodox video;


Before the video commences we are introduced to the dictionary definition of Orthodox and unorthodox. Similarly, we have installed our own quote only this one has derived from the Call of Duty game. From playing Call Of Duty campaign earlier in the week, when you die you see quotes from soldiers who have fought in war. The quote being 'people are not remembered for the rules they follow but the rules they have broken'. When coming across this, I felt we could implement it into our own video as it similarly relates to being young and enjoying yourself. Which is the reason why we added the Live life to the fullest to translate an indirect war veterans quote into something more related to the viewers. Despite in my opinion being a little cheesy to view on the big screen, people seemed to enjoy it so I guess it works :)
How I have improved from the AS year
How I have improved from the AS year
Over the AS year, I knew how to use all of the media techniques used in our music video from the previous year studying thrillers.However, we had one dominant editor that done most of the tweaking to the final piece. With me giving suggestions, I didn't get a shot of editing itself. My role was more giving feedback and underling the points that didn't make sense. In my A2 year this was flipped. As editing was my job in the group as well as performing for the camera. Most skills were forgotten over the six weeks holiday and upon regaining them I was able to use the skills that I picked up from the AS year and reflect it in my A2 piece. On my AS thriller (Violet) there was a lot of tampering with the brightness and contrast giving the "Tyga" look to the video (see blog 'Tyga Tyga') which basically makes the video a lot more sharp and wholesome, despite knowing of its existence there was not much of it used in our final edit as superimposition dominated the Flashback music video. This was used very often to create the drunk feel we had been going on about since we knew what song we was choosing. This appeared mildly in Violet and was pretty much a one off. In the case of Nathan Miller - Flashback it is used on most clips as the song begins to pick up. This also connotes a "flashback" feel to the song. Jump cuts, a technique used in many AS thrillers , played a significant factor in the music video as I was allowed to experiment and really make me, Asilhan and Temi look "cool" as we moved to the beat using a simple technique, cutting and deleting in between cuts to make us move rigid and to the beat of the song. Paired with the slow motion proved to work very well as party scenes do often have slow motion to allow the audience to see clearly the highlights of the party, in our case the shot of our friend Diego getting water thrown in his face was quite humorous amongst peers so by slowing it down gives some memorable value to everyone. By clicking the reverse button on the modify, change speed effects, it allowed to quite simply bring the selected clip to be played backwards accentuating the drunk feel to the song as you can see what is going on. But with the superimposition it really disorientates the viewer and accentuates the drunk feel. This was new but it wasn't rocket science, simple to use but highly effective none the less. Fade in fade out made its first appearance in my books, making transitions a lot more smoother because before this I was razoring the clips and manually changing the opacity which made transitions look very stiff.
Overall, Camera and acting skills have changed little but editing skills have increased by a lot. As I learnt new skills and refreshed my previous skills.
Saturday, 26 November 2011
Intertextuality
Production of music video
We decied to add in some text at the beginning of our music video. We wanted to include a quotation from the artist (Nathan) that linked to or song. We got this idea (intertextuality) from the music video "Unorthodox" by Wretch 32 featuring Example.


These texts are added at the beginning of the video, explaining the meaning of their title 'unorthodox'. So we decided to take a similar approach...

The text we added looks very similar to this (I wasn't able to get a clear screen grab of the original thing). It links to our video as we are trying to put across the message "life is too short, go out partying and just enjoy life."
Production of music video: Editing DONE
EDITING FINISHED!!!!!
We have finished our music video and are very happy with our final piece. When other people from our class found out we finished they wanted to see how it was so we decided to let them watch.
I decided to film them watching our music video using a flip-cam.
Here is the video i filmed using the flip-cam with a few people from our class watching our music video.
I didn't film them watching the whole music video as it would be pointless so i recoreded them watching the beginning of the music video then the end...
As you can see the reaction we got from the people from our class is positive as they liked what we have achieved.
Production of music video: Editing
Overall Effects
I've decided to do a quick blog about all of the effects we have used to show the range of skills we have got when it comes to editing.
Superimposition -When two or more shots are layered on top of each other.
Through-out our video we use superimposition as it links to the concept of our music video.
Changing brightness - As some shots were to bright and dark we changed the brightness of them to make the video look more professional and consistent.
Changing colour - We changed the colour of some shots so that our artist stands out more.
Changing speed - We changed speed of some shots so that they look more effective, we also showed some shots in reverse so that they stand out more when watching and thinking of the music video.
Adding text - We added text to the beginning of the music video so that people would have a few ideas of how the music video will be. The text says "People aren't remembered for the rules they follow but the rules they break. Live your life to the fullest" this links to our music video which is about a party and having a good time.
We also used other editing effects such as fade in and outs. The most obvious cut we used is jump cuts. I believe the jump cuts work perfectly in our music video as the song has a fast tempo to it.
Production of music video: Editing
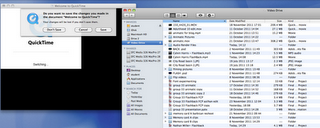
Getting a better quality version of our song
We realised that the soundtrack we was using for our music video wasn't to the best quality so we decided to find a better version of the song with better quality.


We found a better quality version of the song on Youtube. We then used ClipGrab to get the song and then on Quicktime to make it the mp4 file into a move file which we then imported into Final Cut Pro. Unfortunately when we imported the new soundtrack into our timeline we had to make sure it was in time with our clips we already edited togther. This wasn't easy as some shots suddently didn't look right due to the artists lip movement.
Here is a video i quickly filmed with a flip-cam to show us in the process of getting the song.
Production of music video: Editing - RED CUPS
OUR RED CUPS
In our planning for our music video we mentioned red cups, this was becuase they give a party feel as a few other music videos do this too. We had many shots where our red cups appears but this shows how strong we was with this idea.

This shot is from the ending of our music video, you can see that there is a red cup with a empty bottle of Jack Daniels in the background. We wanted to make sure a red cup was in the final shot as it would again symbolise that the music video was based on a party.
Production of music video: Editing - Adding Text
ADDING TEXT
After already trying out with text, we decided that the begining of our music video needed something extra as we had a plain black screen for the first few seconds.
This is the text we tried out earlier using LiveType

We decided that instead of saying 'Flash Back' we wanted to show a quote that would match our music video. Nathan then thought of a quote, although it sounded cheesy I believe adding text to our music video gives it a different look as there isn't many music videos like that.

This wasn't as easy as it sounds as we had to make sure we chose the font, text and positioning so that it has as much effect as it would.
Here was a quick video i filmed with a flip-cam to show how achieved our text look.
Our main inspiration to this idea was from the music video 'Unorthodox' by Wretch32. At the begining of his music video he has text that appears that relates to his song.
Friday, 25 November 2011
Production of music video: Editing Speed
Editing Speed
We decided to show some shots in reverse as it would make our music video more eye-catchy and different then others, we also changed the speed of some clips to make it more effect but also becuase the equipment we was given had many MAJOR problems.
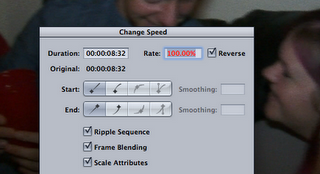
Here you can see we was trying out how some of our clips will look in reverse, I didn't see no-one else use reverse clips so I believe it would make our music video stand out more.
We also slowed down some shots to make the shot more effectful. The effect also relates to our song and video as our video is about a party after, we slowed down some shots of showing how people ended up after the party as well as other shots too.
Production of music video: Editing Brightness and Colour
Editing Brightness and Colour
We have realised that that one of our shots are too bright while another one didn't look great because of the colour. We decided to play around with the lighting effects on Final Cut Pro to see if we could make the shot look better.
We were also experimenting with the colour effects on Final Cut Pro. As we listened to everyone's ideas as a group we listened to Nathans concern that his spot was to obvious in the shot. As a group we didn't think it was a major thing but after experimenting with the colour effects it made the shot look much better then before.
Production of music video: Editing
Editing After Rough Cut
After finishing our rough cut we started to edit our final music video.

These are the jump cuts we already did for our rough cut, we are now going to add more jump cuts through-out the video to make the music video more busy and eye-catchy.
Here you can see that we're marking up where the beat of the song is. This will help us to identify where we can have our jump cuts. We listened to the song while clicking on the stereo tab to make the soundwave to show which makes it more easier to fund where to mark.
Here you can see that after putting all of our markers in on our song we simply got some clips and used the razor tool to cut up a clip and then deleted some sections of the clip, then we put the remaining pieces together to looks like jump cuts which change on the beat of the song.

Here is a quick video i filmed using a flip-cam of me and Nathan editing
Finished Editing =]
Below is just a short video of me and my group memebers signing the "Editing Finished" A2 media checklist. Enjoy!:
Analysis of Rough Cut
Analysis of Rough Cut
The video starts of with a blank black screen while the music starts; we have jump cuts for the first 14 seconds of the video that were editing on the beat of the music. We then cut to a mid-shot while rotating around our artist Nathan; we edited this shot with another shot we took from Brick Lane by using superimposition which blends the two shots together. The shot is used so that the audience can identify the artist before he starts singing.
When the singing begins we cut to a close-up of Nathan singing while rotating around him, but I personally do not like the shot as it cuts to another clip while showing the back of his head which makes he video very unprofessional. This is shown at 00:19 of the video.
Also at 00:19 the shot matches the lyrics which says "I’m coming round and now my vision is so clear" the shot shown is a rotating shot matching the 'coming round' part and 'my vision is so clear' contrasts with the editing effect we have used which shows shots layered on-top of each other.
As the song has a 3 beat part that keeps appearing it gave us the chance to make many jump cuts, which we did as you can see at 00:31. We had two different base tracks in the same location but in just different sides of our artist so I decided we could try to see if editing those together works. I believe it looks ok but me and my group members does not want our music video to look ok, we want it to look eye-catchy, jumpy and busy but with still shots in the afternoon we cannot achieve this. This has made us think if we should use these base tracks at all through-out our video as they look to still and boring.
We then cut to another base track at 00:39 which I personally like as it looks like our artist is standing in the water with birds flying behind him but as I said about our other base tracks we used before this shot, it looks to stationary and doesn't really match our song.
We have a lot of work to do for our final music video but I believe we can do a great job. We're thinking of using superimposition through-out our music video as it adds layers to the lyrics of the song as its flashbacks. We want to add more party shots through-out the video while showing Nathan sing to show that while his singing we can see what happened the previous night.
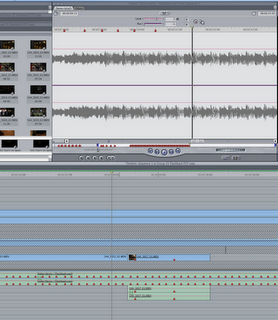
(Editing) After Rough Cut
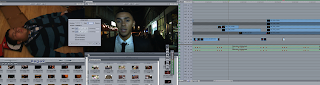
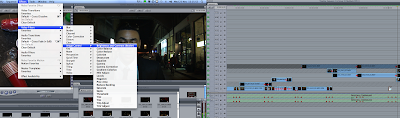
Below are some screen shots of the editing process after our rough cut:
|
| Here is just a shot of some of the jump cuts that we previously did before our rough cut, we hope to ad more of them to make our video smoother. |
.
|
| In this shot we are putting down markers (The little red pentagons on the sound wave) to the beat of the song. The reason for this is because it will make it easier for us to identify where we can have some jump cuts and also it helps us to get the lip-syncing in time with the audio. |
|
| As you can see in the image above; where we have put markers down on the audio, we have also used the razor tool to cut in the exact same point on the video. This makes it easier to cut out the parts we don't want from each individual base track |
Neighbouring feedback
Neighbouring feedback
Whilst we were editing the neighbouring groups, grouped together to watch our final piece. We recorded this and here it is:

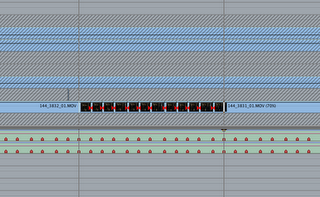
Editing III
Editing III
Third and final editing pictures taken on the final brush ups of Nathan Miller Flashback.

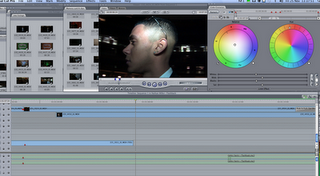
This screen shot illustrates the colour correction tool, which allows the user to modify the colours to their choice. In our case, I was bothered that a close up had my spot in plain view, but I knew this could be masked with a change of colour so we used the tool to do that but I also received feedback that the shot was too bright, this predominantly being down to the fact that the background was dark and I was bright because of the spotlight in my face. So it also toned down the brightness.

A quick screen shot displaying a finished piece of jumpcut work and just a general idea of how our timeline was shaping up to look like with the markers, the cuts and the modified speeds.

This screen shot allows us to see the legendary red plastic cups that appear in all parties. This is the conclusive shot of me and my friend Mirella and I wanted the red cup to be visible along side a now empty bottle of Jack Daniels, all referring to previous blogs.

My teacher noted that the sound we had edited on, was not the original. So we had to go onto youtube and get the old song and then put it through clipgrab and then quicktime to make the mp4 into and mov file and then import it onto our timeline. This was slightly frustrating as when trying to pair the new sound with all of the markers and already edited clips proved to always be a slight bit out of sync. This also informed me that even though some clips were in sync my actual lip movement was out of place. But this is something that at this stage I could not have done anything about, apart from layer a clip on top or cut more quickly to drive attention away from it.

The final screen shot shows an addition of text to fill in the blank gap. In the end we didn't need to use precautionary message as there was not many flashing images. So instead a quote was used to make the audience think before they enjoy the video.
Editing II
Editing II
Continuation of the editing screen shots.

A significant editing feature I was reunited with from the AS year, was the "Fade in fade out dissolve", which as the title reads, fades in and fades out. I saw it appear in a friends music video and it refreshed my memory that it even existed because before that I was razoring the tracks and individually changing the opacity to manually fade it out. Which looked very rigid, so by using this it made the transitions flow a lot smoother and just made me have to go back on my work and input where necessary...

... as shown in this screen shot above, we can see the last effect used was the fade in fade out, showing its popularity amongst my editing. The screen shot itself shows the beginning of the fast paced drop of the music so what I was about to do in the music video was begin razoring the song to the beat and deleting the blocks in between to make the clip jumpcut to the beat.

This screen shot briefly shows me marking the beats on the timeline mentioned. As you can see, it is a lot easier to hit the beat when you just have to mark the peaks of the sound waves. This also lowers the difficulty when coming to creating jump cuts.


In addition to modifying the speed, I also reversed some of the clips to really disorientate the viewer with the slow motion superimposition clips, just adding to the drunk effect. This made our video dynamic, and really interesting to watch.

The final screen shot shows the process of creating a jump cut, where all that was necessary to finalize the process was to drag the clips together to fill the gaps.
Everyone is talking about it!
Everyone is talking about it, just take a look in the office;
GoAnimate.com: everyones talking about nathan miller by Nathan


Subscribe to:
Posts (Atom)